Showing posts with label grass-fed beef. Show all posts

Thursday, March 3, 2011

Simple Slow Cooked Garlic Studded Grass-fed Beef Brisket with Mushrooms


That title is a mouthful.  I could also add any number of modifiers such as "delicious," "mouthwateringly delectable," and just plain old "awesome," but I think the name includes the most important bits.

This recipe is dead simple: poke holes in the brisket and shove in some garlic cloves, season, throw in a load of sliced mushrooms and more garlic cloves, and slow cook away for a day or overnight (8hrs).  I originally watched Emeril way back when garlic stud his roasts and loved the idea.  I've used it before in my recipe: Not Your Mama's Pot Roast.  It is a great way to flavor the meat and insert little pockets of meltable deliciousness into the beef.

And wow is the outcome amazing!  The garlic beefiness just fills the house and wafts outside to make your neighbors jealous.  And everything about the finished meal is delicious--the rich, savory jus (or juice as in au jus--"with [it's own] juice") created just from the beef and the mushrooms, the garlicy mushrooms and spreadable garlic cloves, and the tender, shred-able beef that stays moist and flavorful, especially when drizzled with jus and topped with mushrooms.  Yum!

Don't Fear the Fat!

Check out that beautiful yellow fat in the photos.  Remember the advice we've all heard to choose brightly colored vegetables?  Well, here is the same idea holding true for meat.  That yellow fat is chock full of vitamin A and E and healthy fats (as opposed to not-so-healthy fats like vegetable oils and seed oils that overbalance our omega-6:omega-3 ratio).  White fat of feedlot beef is not only less nutritious, but it also carries a heavy toxic load since the fat is the storage place for most of the crap we pump into those poor, sick cows to keep them alive long enough to fatten them up for slaughter. 

On the other end of the spectrum, both in terms of nutrition and humane, sustainable husbandry is grass-fed (and finished) beef from pastures.  Its fat is healthy fat, full of CLA (conjugated linoleic acid) and omega-3 fatty acids.  Omega-3 fatty acids are anti-inflammatory and great for recovery from exercise and inflammatory ailments (hence many use fish oil supplementation).  According to Eat Wild (a source for finding local pastured products), CLA may fight and reduce the risk of cancer. A diet rich in omega-3 fatty acids and CLA is closer to our ancestral eating profile, which is how our digestive tract evolved and how it still functions today despite the disconnect most people have between their anatomy and their diet.  Enjoy what nourishes, not harms.

Bottom line: Don't shy away from eating healthy fat!

Without further ado, I give you Simple Slow Cooked Garlic Studded Grass-fed Beef Brisket with Mushrooms:


Simple Slow Cooked Garlic Studded Grass-fed Beef Brisket 
The simple combination of minimal ingredients and fuss-free slow cooking create a delicious meal fit for a holiday feast or simple weeknight leftovers you actually look forward to!


Cooking Time: Start to finish, about 8.5hrs but 8hrs of that are spent unattended while slow cooking

Ingredients:
  • grass-fed beef brisket (we used about a 3-lb brisket--you could probably use any similar cut of roast)
  • lots of garlic cloves (to save time and effort, you can buy whole, peeled garlic cloves*)
  • lots of sliced mushrooms (to save time and effort, you can buy these sliced as well*)
  • salt
  • pepper
Method:
Add 1-2 packages of sliced mushrooms (or about 3-6 cups if you prepare them yourself) to the bottom of the slow cooker pot.  Depending on the size of your brisket and your slow cooker, leave enough room for the brisket to sit on top of the mushrooms and still lid the pot.  Add some whole garlic cloves to the mushrooms and distribute them.

Prepare the brisket by creating deep slits with your knife and inserting a garlic clove in each.  Try to get good coverage and be as thorough as you have the patience for.  Turn over the brisket and repeat on the underside and then try to get as many in the sides of the meat as possible.  Once finished, sprinkle on salt and pepper and rub it around the brisket to season it.

Place the brisket on top of the mushrooms and add another package or 3 cups of mushrooms on top and around the sides--basically jam in as many mushrooms as you can fit--remember, they cook down and they are adding some of the moisture that is keeping the roast tender and juicy.  Add any remaining garlic cloves you had leftover from the brisket studding or if you just want to add some more you have around, feel free--the more the merrier!  The garlic roasts into a mellow, spreadable deliciousness, so fear not!

Now, set your slow cooker to Low for 8hrs and walk away.  Your job is done until the time comes to unlid the pot and feast!  Hope you enjoy this as much as my husband and I did!


* I know hard-core cooking purists will cringe at the use of any convenience foods like sliced mushrooms and peeled garlic cloves, but if it helps more people cook real food for themselves and their families by cutting corners in minimal areas (they are still using one-ingredient-on-the-label foods), then that is a win in my book.  I'd rather offer an approachable recipe than frustrating those who are time-crunched with yet another recipe that takes too long to even try.  And this recipe is well worth the minimal effort required!

Thursday, January 20, 2011

A Dinner in the Zone: Hearty Paleo-Zone Chili on Roasted Portobello Mushroom Caps with Crunchy Slaw


Those of you Zoning with me may be a little sick of the piecemeal, thrown together meals we often fall back on.  The ease of just finding a Protein source from the list, Carb source from the list, and Fat source from the list and combining odd choices just to get the balanced blocks can take it's toll on your meal-time satisfaction.

But I am here to offer another option: cooking a Zone meal that will make many dinners to come as easy as portioning and reheating.  And did I mention that it's filling AND delicious?  Sometimes with the calorie reduction inherent in the Zone Diet and the emphasis on fruit and starchier carbs for easier blockage, people feel hungry all the time and starved.  This meal utilizes lower glycemic ingredients (vegetables) to satisfy you at the end of a long day of weighing and measuring. And it's filling whether you're eating only a two-block portion or a five-blocker.  Yes, eating well CAN actually happen on the Zone!

THE MEAL

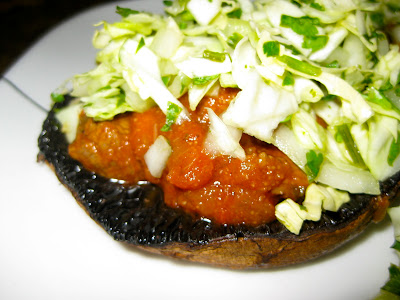
I began my Paleo-Zone challenge last Saturday and will post my food log soon, but for now, let me share with you this amazing meal I've had for dinner this week.  And with the amount my husband and I made, we'll probably still be having this meal well into next week :)  This meal is Hearty Paleo-Zone Chili on Roasted Portobello Mushroom Caps with Crunchy Slaw spooned on top (all recipes follow).  It's delicious and hearty--which is no simple task when cooking and eating on the Zone.  At two blocks or five, this meal will fill you!

The chili is a rich and spicy mix of vegetables and grass-fed beef.  It is FILLING, which is the perfect quench for end-of-day hunger, and it's warming to combat chilly evenings.  I was inspired by paleo chilis that hold the beans, Alton Brown's amazing Pressure Cooker Chili (sans the pressure cooker for us) that turned us on to using chopped beef instead of ground beef, and the Chan's Chili recently posted in the CrossFit Journal, which helped us Zone proportion our chili. Whether you Zone or not, this chili is amazing and you definitely won't miss the beans. 

Instead of straying off the Paleo Diet for rice or tortillas, I serve the chili on Roasted Portobello Mushroom Caps that add a meaty base.  SO much more filling than rice or tortilla, these mushrooms are a great base for any meaty sauce.  The chunky, silky texture of the chili is complemented perfectly by crunchy, lime and onion slaw I call Crunchy Slaw.  It is SO easy to make and adds that taste and crunch that definitely kicks the chili up another notch. 

For the recipes below, I used P, F, C to stand for Protein, Fat, and Carb, which the Zone Diet uses to balance food.  A block of Protein = 7g protein, a block of Fat = 1.5-3g depending on the fattiness of the Protein, and a block of Carb = 9g after fiber is subtracted.  For Zone Block charts, check out this compiled list: http://www.mitymous.net/weights/zoneblox.htm

NOTE: there is definitely some flexibility to these measurements as some of the foods I used below have different measurements based on different Zone block lists.  Since this meal is mostly veggies, I am not going to fuss about which count is correct and whether I have measured it precisely.  The Zone is enough effort just to weigh and measure everything.  In this case, allow yourself some leeway on the veggie counting and err on the side of MORE.  :)

Without further ado, here are the recipes!

Hearty Paleo-Zone Chili--this is only one of three containers we filled to the brim!

Hearty Paleo-Zone Chili
Definitely not for a quick meal, this endeavor will provide you with chili to feed an army or yourselves for a week (maybe two?) on the Zone.  The medley of grass-fed beef, assorted vegetables, and spices will heartily fill and warm your belly. 
Prep Time: 1hr give or take your mad knife skills and helpers
Cook Time: 2-3+hrs, slow cooker for the day/night or stovetop for a few hours until tender and delicious.
Quantity: see Our Totals below.  You can use the ingredients in your own proportions to make the quantity you desire.  We're going for a 2P:1C:1F ratio so you can serve this on Roasted Portobello Mushroom Caps with Crunchy Slaw on top.

Ingredients:
NOTE: I'll give what makes a block and how much we used, but you have to be your own guide for making this Zoned to meet your desired quantity and taste.
  • yellow onions, chopped (1.5c = 1C, 10 onions gave us 10c = ~6C)
  • mushrooms, chopped (3c = 1C, one container of sliced mushrooms = 3C and we used 4 = 4C)
  • can of crushed tomatoes (with Basil) (check your label, ours was 1/2c = 1C and we used (2) 28oz. cans or 10C)
  • zucchini, chopped (2c = 2C, we used 6 small ones and got 8 cups or 4C)
  • grass-fed chuck roast, chopped (1oz = 1P and we used 56oz = 56P)
  • container of salsa (check your label, ours was 1/2c = 1C and we used 2c = 4C)
  • cumin
  • chili powder
  • salt
  • pepper
  • garlic powder
  • olive oil (1T = 9B and we used 3T = 27F)
  • optional: chili peppers or other heat multipliers (NOTE: the chili powder and cumin made this pretty spicy on their own, so play around with it to your taste)
  • a writing instrument and sheet of paper to record your amounts and calculations

Our Totals: 56P, 28C, and 28F is a 2:1:1 ratio, so we need to add a Carb and Fat to every portion of chili.  That is perfect for a serving with Roasted Portobello Mushroom Caps (1/2C, 1F) and Crunchy Slaw (1/2C) (see recipes that follow).  Our finished batch was 187oz. and dividing by the 56P that went into the pot gives us 3.33oz for 1P, 1/2C, 1/2F.  Your batch will vary on your ingredients and finished thickness and weight, so do your own math on this one.  Sorry, Zone cooking isn't a piece of cake, but it is well worth the effort to not stress about dinner for a week (or more)! :)

Method:
Chop till you are blue in the face.  You should start on the onions and add them to a large stock pot set over medium high heat and coated with olive oil (1T worked) and a little salt.  I like to season as I add new ingredients into the pot, a lesson learned from years of watching Emeril as he bammed the crap out of his dishes.  Stir the onions every time you add more to the pot and add more oil if they start to stick.  Record how many cups of onions you use and keep a running tally of the oil.  Remember to try to be frugal with the oil if you want to stick to plain Jane Zone. Those of you lean enough to be using Fat multipliers can have more flexibility--damn you ;).

Meanwhile, a second pair of hands can chop the chuck roast into tiny bits, cutting out any really awful sinewy parts if desired.  Once that's cut, weigh it to use your desired amount and write that number down so you can figure out total blocks later on.  Using another skillet, coat with olive oil (1T worked) and brown the beef (use multiple batches so you only have one layer of meat in the pan, add more oil for each batch--it took us two batches using a big skillet).

Next, to the onions in the stockpot, add the sliced mushrooms (I bought them already sliced, so no prep there!--measure them out if you want to be precise, but for each styrofoam-like container it was about 3c).  Stir and cook them down.  We're looking for translucent if not browning onions and reduced size in the mushrooms as they cook.

The first pair of hands can move on to chopping the zucchini or you can get to it after the meat is done.  Measure out how much you use by the cupful.

Once the meat is done, add it to the stock pot (batch by batch is fine), then add the zucchini, tomatoes, salsa, and spices.  For the spices, be your own judge based on how much you are making at once.  Remember, it's always easier to add more heat later than find Zoneable ways to reduce it after the fact. Unfortunately sour cream and guacamole are Fats that will easily devour your blocks unless you allot them.  Let your chili reduce over Medium heat until you like the thickness, then Low for as long as you like to meld the flavors and tenderize the beef and veggies.

Once done, you have one more fun task: measuring the result of your labor of love.  We tried to be sneaky and weigh the empty pot, then the full pot, but the pot was too heavy for the scale :(  So we weighed storage containers and then filled them, took their weight and got the whole picture the hard way.  You could also measure by Pyrex liquid measure as you remove the chili from the pot and place in storage containers.  Either way, from that number of total weight, divide it into total blocks of Protein and figure out ounces or cups per block of Protein.  From our ingredients, we came up with a 2:1:1 ratio and found that 3.3oz. gives us 1P, 1/2C, 1/2F.  Yours will vary based on the quantities and thickening of your chili.

We served ours over Simple Roasted Cauliflower (3c =1C, plus a little fat) or Roasted Portobello Mushroom Caps (1/2C) (recipe follows) with Crunchy Slaw (1/2C) (last recipe) on top.  


Roasted Portobello Mushroom Caps
For a meaty base perfect to hold chili, burgers, ragout, or anything else you desire, try better-than-bread roasted portobello mushrooms!
Cooking Time: 15min+, really as long as you like to get them tender and juicy
Quantity: 2-3 roasted caps, depending upon size, is about 1/2C if 3 cups = 1C

Ingredients:
or parchment paper and baking sheet
  • portobello mushroom caps (rinsed and stems removed) (3c = 1C, so 2-3 caps after roasting seemed like 1/2C)--NOTE: make extra so that you have meals for a few nights.  The mushrooms will keep well sealed up in the refrigerator.
  • olive oil (1/3t = 1F), optional
  • salt 
  • pepper


Method:
Preheat your oven to 425 degrees. Line a baking sheet with Silpat or parchment paper so you don't have to use fat to grease the pan.  Place mushrooms on the sheet, gills up.  Sprinkle caps with salt and pepper and drizzle on the olive oil you need to accumulate your desired fat blocks.  If you don't have any fat to spare, the caps are fine without any oil.  The liner is our insurance :) Place the sheet in the oven and bake until juicy and tender.  These are perfect to make in bulk while you are preparing and cooking the chili!  Afterwords, you'll have a delicious base to your chili that is spoon tender, meaty, and filling!


Crunchy Slaw
The perfect crunchy slaw for your spicy dish!
Prep Time: 5-10min tops
Quantity: Made enough for at least 4-6 plates, so about 1/2C for each serving. 

Ingredients:
  • 1/2 head of cabbage (4c = 1C)
  • 1/2 onion (1.5c = 1C)
  • 1/2 bunch of cilantro (unless you are using a bucketful, it's unlikely you'll come close to a block)
  • 1 lime, juiced (1C)
Total Blocks = 3C

Method:
Chop the cabbage, onion, and cilantro as finely as desired and mix well.  Add lime juice and mix again.  There you have it!  This is a perfect, crunchy, tasty accompaniment to tacos/chili/anything Mexican inspired!

So there is your meal: Hearty Paleo-Zone Chili served on Roasted Portobello Mushroom Caps with Crunchy Slaw on top!  Here's to enjoying what you eat on the Paleo-Zone Diet!

Thursday, November 18, 2010

Slow Cookin' My Way to Delicious


I know, I know--it's been awhile. In the last recipe post I made: Broiled Bacon-Fat Smeared Broccolini, I made the case for how I eat so simply, there's no recipe required. When you are eating meals with simply a meat, a vegetable, and some fat, there's not much to blog about. The old standbys of carnitas, grass-fed beef steaks, grass-fed beef burgers, rotisserie chicken, and turkey breast are all my go-tos. And that's okay. Most of us don't live our lives with something new at every meal. If you like something, you eat it often until you get sick of it. Most people rotate their meals around just a few different varieties. And that's okay as long as you're trying to get a good variety of healthy foods on your rotation. If a recipe is good enough to keep your attention and appetite for quite some time, that's a winner!

Since I HATE cooking late in the evening when I get home after work, I've found myself relying on store bought meals too often. Sure, they can be satisfying paleo-style eats, but it gets tiresome and expensive. I was looking for something new to try when slow cookers caught my eye. I had always thought of them as a fire hazard and never dreamed of leaving something plugged in and cooking all day alone with the cats while I was out and about. But then I realized I could cook something overnight and everything changed. I went with Consumer Search reviews and bought a slow cooker.

Wow, with just a little prep at night and no fuss cooking while I'm sleeping, I have food for a good few days. And the best part--it's freakin' delicious!

My first recipe was a chicken following fellow paleo/primal blogger (who btw is awesome--check out the linked website for fantastic recipes!) The Nutty Kitchen's recipe for Crock Pot Spiced Whole Chicken. OMG it was amazing!  I loved the spice combination and the hearty stew-like sauce it made without any added liquid.  You HAVE to try this recipe!  I fell head over heels for my slow cooker :)

My second attempt was a pot roast. I was thinking of doing onion soup since the onions came out so terrific in the chicken recipe, but onions and I have a hard time getting along. I've tried glasses, contacts, and even my old chemistry goggles, but I still have a hard time cutting them or even being the house with them once they are cut.  I am streaming for the rest of the evening while dinner cooks, even if I wasn't even in the room while they were being cut.  Not fun.

So I had a defrosted Morris Grassfed chuck roast and not much else.  Time to pull something together: MacGyver-style.  Since I had recently marinated a grass-fed flank steak in cilantro and lime juice, I had some leftover limes and chopped cilantro. We always have some coconut milk lurking around the cabinets, so that was an easy pairing for a coconut curry. Thai red curry paste was hiding in the fridge and I had just enough to create a little paste. The garlic packets are now my go-to for easy garlic prep (don't hate me). I threw everything in and realized I forgot to cut the roast to get more flavor into the thick hunk of meat. So sliced it in the pot (carefully! without scratching the pot), rubbed it all around with my hands to moosh the milk and seasoning all together into all the nooks and crannies, then closed the lid.  It took all of five minutes. Yay!

I looked at the slow cooker directions for chuck roast and decided it was somewhere between beef roast (which was 4hrs on Low) and brisket (which was 8hrs on Low). Six hours was perfectly tender and cooked with an aroma that filled the house, giving the "OMG that smells so good it made me hungry" response from my husband every time he went outside and came back inside.  Cool!

That lasted us a good week having it sporadically with lunches and dinners so as not to get tired of it. The sauce was AMAZING sopped up in cilantro-lime cauliflower rice and served in a bowl with a spoon like a stew.  I even sopped it up with broiled bacon-fat smeared broccolini (I could have that every dinner)!  So we tried the recipe a second time, being more diligent with the prep and using a different, tougher cut of meat to see how it works and....perfection! The roast is outstanding once again. Try it yourself!


Slow Cooker Coconut Curry Pot Roast
Lip-smacking delicious--this is juicy, tender, shred-able beef fit for a feast!


Prep Time: 5-10min
Cooking Time: 6hrs on Low (or according to your own slow cooker's directions)

Ingredients:
1 can of coconut milk (NOT light)
1/2 bunch of washed, chopped cilantro
1-2 limes, juiced
2T Thai red curry paste (make sure the ingredients fit the bill, I used Thai Kitchen brand)
3 packets (more or less, your choice) of garlic (or about 20+ cloves)
3-4 (or more) -lb grass-fed beef roast (sirloin and chuck have worked well), deeply scored for more surface area
NOTE: despite being a curry, this one is very mild on the spiciness--if you want to liven it up, try adding some heat yourself (more/hotter curry paste, hot peppers, cayenne, etc.).

Method:
After you have the ingredients prepped, make a paste of the curry and lime juice so you can smear it over the roast (nooks and crannies too!).  Add the garlic and insert into the deep cuts in the roast (it'll melt like but-tah--oh yeah!).  Sprinkle on the cilantro and shove some in the pockets of the roast.  Now pour on the coconut milk.  Lid.  Walk away for six hours and return to deliciousness!

Note: most slow cookers change to warm after their cook time, so it's best to make this right before you go to bed.  Then, when you wake up, you can turn it off and cool it on the counter before whacking it in the refrigerator before you leave for work.  When you return home, the sauce will have congealed a bit, but some heat will melt it all back into a savory, deliciously rich sauce and warm that meat for shred-able delight.  Serve with a spoon as a stew or over Cilantro-Lime Cauliflower Rice (recipe below) to sop up that flavor.  Yum!

Leftovers will last covered/sealed in the refrigerator for a week.

Cilantro-Lime Cauliflower Rice
I was trying to replicate Chipotle's cilantro-lime rice and it works--quite tasty and a great accompaniment to the roast for sopping up the delicious curry sauce!


Prep Time: 15min (or less)
Cook Time: 15min (or less)

Ingredients:
1 lime (or more to taste)
1/2 bunch washed, chopped cilantro
1 small head of cauliflower / half a large head per diner (more or less depending upon taste)
salt to taste

Method:
For my basic recipe, check out Kristy's Cauliflower Rice.  Here is a derivative:

Wash the cauliflower and break into small florets. Food process them in small batches, looking for the cauliflower to stick to the sides and the blade to spin freely (it tells you when it's done!).  Once done with all the batches, you can either cook with the cilantro, lime, and salt in a skillet or microwave in a covered container until softer and less smelly (cauliflower smells strongly once cut--try to cook it or freeze it at once, seal it up tight, and eat it quickly or your entire house will smell pretty sulfurous). The time it takes depends on your preference for doneness and how much you are trying to cook at once, but it's usually no more than 15min max for large batches.  Stir periodically during the cooking.

Alternatively, you can pre-cook halfway and freeze until you need it.  Then, just defrost, squeeze out some accumulated water or drain, and add the seasonings and cook briefly.  Since cauliflower rice is so messy (those little bits get EVERYWHERE), I like to make a whole bunch and freeze what I don't immediately need.  Timesaver!


So there you have it--a meal that takes very little time to prepare and feeds you and your friends/family heartily or lasts you a good few dinners and lunches.  For me, a slow cooker definitely earns its keep, helping me break out of the "I don't feel like cooking" slump and reinvigorating my paleo-style meals.  I highly recommend it!

Oh and in case you haven't seen me on Facebook--please follow the link in my sidebar and friend me for updates and connecting back and forth!

I'm also included on the weekly Paleo Rodeo graciously hosted by Modern Paleo when I get my post together in time.  Check it out for some fantastic recipes and paleo/primal discussions.  Thanks for hosting, Diana!

Wednesday, April 14, 2010

Adventures with Grass-Fed Beef Part I

Happy cows come from California (and Hawaii for those in this pic)!

As I make my way through the last of my second half a cow of grass-fed beef *sniff* *sniff*, I have found the need to catalog what I can do with the different cuts.  So this series will serve as a resource for us to find great ways to cook grass-fed beef.

Through trial and error, I've wandered the relatively uncharted territories of cooking different cuts of grass-fed beef (a very different meat than conventional beef).  One difference between grass-fed and conventional grain-fed beef (ubiquitous in the US) is that grass-fed is healthier.  It's packed with healthy omega-3 fatty acids, CLA, vitamins, and minerals instead of chemicals, pesticides, antibiotics, omega-6 fatty acids, and remnants of their dietary grain (they are what they eat).  Grass-fed is also leaner, which fatphobes jump on as reason enough to partake, but to the less naive, fat is not really the issue since fat is good for us, especially saturated fat.  However, bad fat like that which is high in omega-6 isn't good for us, another tic against grain-fed beef.  The fat of grain-fed cattle is also toxic since fat is the storage site of many of those chemicals pumped into grain-fed cattle to get them to survive their deadly diet and abhorrent feedlot conditions.  For more about why we should eat meat and why it should be grass-fed, pastured, or wild-caught read my Starter Series: 1. Eat meat and if you are still confused about fat, read my Starter Series: 3. Eat fat.  UPDATE 4/15/2010: Fitness Spotlight just posted a great reference for why grass-fed trumps grain-fed: Advantages of Grass Fed Beef and Dairy.

Think it is okay to keep eating grain-fed beef because grass-fed is SO expensive?  Not sure it really matters all that much anyway?  Read this: "'Growing Concern' over marketing tainted beef" recently from USA Today.  Choice bits:
Beef containing harmful pesticides, veterinary antibiotics and heavy metals is being sold to the public because federal agencies have failed to set limits for the contaminants or adequately test for them, a federal audit finds.
Sound yummy?
Some contamination is inadvertent, such as pesticide residues in cows that drink water fouled by crop runoff. Other contaminants, such as antibiotics, often are linked to the use of those chemicals in farming. For example, the audit says, veal calves often have higher levels of antibiotic residue because ranchers feed them milk from cows treated with the drugs. Overuse of the antibiotics help create antibiotic-resistant strains of diseases.
This story is not alone.  Look into it and you'll be nauseated.  Read The Omnivore's Dilemma and you'll be in tears.  Now are you convinced grass-fed beef is worth every penny?  If not for the sake of the animals, then for the sake of your health.  I think it pays to know your meat and follow your common sense: eat food that nourishes, not harms.

It also saves to buy in bulk and invest in a large freezer.  For roughly the price per pound of grass-fed ground beef (just over $6), I get roasts, ribeyes, NYs, ribs, filets, flat irons, and all the less expensive cuts (stew meat, ground beef, skirt steak, tenderized round, etc.) and 160lbs of it if I buy half a cow.  I buy from a local source: Morris Grassfed located in North-Central California.   The cattle graze on coastal grasslands like those in the picture above.  They are slaughtered humanely--check out the FAQ (definitely one of my considerations).  They are never fed grain or given hormones or sub-therapeudic antibiotics.  Morris Grassfed also has a cute video series about how their food production is helping to recreate grasslands as a holistic management system.  Here is the first part:


You can find your own sources for grass-fed beef at Eat Wild, a great resource for finding local, sustainable, pastured meat.

So here are past recipes with my grass-fed beef:

The Easiest Meat Preparation Known To Man: Seared Steak
--usable with nearly any steak cut from jewel of the cow ribeye to filet to skirt steak and even that dreaded tenderized round (still haven't figured out the optimal preparation for that yet)

Not Your Mama's Pot Roast
--great with chuck roasts and briskets

Basic Meat Sauce
--one of the myriad of uses for grass-fed ground beef

(updated 1/11/11) And newer recipes:

Noodle Nosh
--an easy, Asian-inspired kelp noodle stir fry

Slow Cooker Coconut Curry Pot Roast
--saves you time with an easy prep and unattended cooking time and creates a DELICIOUS meal to feed  the whole family with leftovers

Today's recipe is for that lunch meat staple: roast beef.  It is useful to have enough meat in the house to get you through the week without running into emergency situations where limited options might jeopardize your paleo-style eating.  Of course, I have a grocery store meal ideas post and a dining out post, but the more meat we can stock the fridge with, the better our chances of success.

I came upon this recipe through trial and error with the lean sirloin roast.  When I tried using it for my pot roast, it came out so dry I couldn't eat it.  Even soaking it and serving it in broth couldn't save it.  Dry as dust.  Okay, the lack of intramuscular fat did me in.  Nothing to melt into the meat to give it a buttery deliciousness.  Second try: dry roasting using this recipe from allrecipes.com.  Success!  While I overcooked the meat, it was still tender and juicy and the seasonings gave great flavor.  I put a little too much cayenne in the mix and set my mouth on fire eating it, but it was good...so good.  So trying again, I mixed up the seasonings to something I like even better than the first attempt and pulled the meat out while on the rare side.  Damn near perfection, and reached it once I served it with raw, grass-fed butter on top :)

So in addition to the Roasted Turkey Breast recipe of yesteryear giving you lunchmeat for a week, try this easy-prep, couple-of-hour-no-fussing roasting of grass-fed sirloin roast.


Roast Beast: Dry-roasted Grass-fed Sirloin
Easy, homemade deli-style roast beef that is just as good for dinner as leftovers and lunch meat for the week.  
Cooking Time: 1-2hrs depending on size of roast and desired doneness

Ingredients:
1 sirloin tip roast, tied with twine, 2-4lbs (more of less, just adjust cooking time as needed)
1T kosher salt (or 1/2T would be fine if your roast is on the smaller side)
1T garlic powder
1T dried oregano
1T dried thyme
1/4t cayenne pepper
1t or about 25 grinds of black pepper
3T extra virgin olive oil (or enough to make a thick paste)
optional: dried basil and onion powder or anything else you like--feel free to experiment!

Method:
Allow your roast to come to room temperature (I'll leave it out while I prepare breakfast and it's ready to go after).  While waiting, prepare a sheet pan with foil or parchment on its surface (easy cleanup!).  Place roast in the middle of the sheet pan.  Mix the spices with the olive oil in a small bowl.  Rub them on the roast (all over and under the twine) and let sit as long as the oven takes to preheat to 350 degrees (make sure you have a rack set in the middle of the oven).

After preheating, whack 'er in and let 'er roast for about 45min-1hr before checking with the meat thermometer.  You are looking for 120-125 degrees for rare, but I would take it out at 115 to 120 to allow for carry-over of 5-10 degrees during resting.  The first time I made the roast, I let it go until 145 degrees, and that was overdone and dry.  You be the judge and remember, you can always whack slices in the microwave or heat in a skillet (say, with some butter?) if you feel it is underdone.  Better to err on the side of underdone rather than overdone, since only a thick sauce can really hide overdone meat.  The taste of meat is exceptional and something most of us have lost; so be wild and try it rarer than you normally would to get the most flavor and juiciness.

Okay, after you find the temperature you want, take it out and let the roast sit for at least 15 minutes before slicing.

Serving Suggestions:
Dare I say it...with a pat of raw, grass-fed butter melted on top?  OMG, heaven!


You can also slice this up and wrap around avocado or mango or fill with guacamole for a delicious anti-sandwich.  Works well sliced into a salad too.  Experiment and let me know what you like best!
Roasting on Foodista

Friday, February 26, 2010

Starter Series: 2. Eat Vegetables.


So this week we embark on the second guideline of our paleo-style mantra: Eat meat and vegetables, nuts and seeds, some starch, little fruit, little dairy, and no sugar, no grains, and no legumes.  We'll identify some key attributes of veggies and get on to the all important discussion of how to get your kids to eat them.  Then, what you have all been waiting for--the recipe!  Onward, ho!
  • Eat vegetables.
While some hard-core eaters might dabble in carnivory, I'm not one of them and still think that some foliage is good in your diet.  Vegetables are great sources of vitamins, minerals, and fiber.  Most vegetables do not spike your blood sugar.  However, some starchier varieties like roots, tubers, and rhizomes are considered high glycemic.  Among these are carrots, parsnips, squash, and sweet potatoes (technically a starch).  Although packed with healthy nutrition, starchier/sweeter vegetables should be eaten in moderation so that you don't incur wild blood sugar fluctuations.  Don't forget the nefarious Always Hungry Carb Crash Zombie.  I've been there and am still getting over my carb addictions...

Some important vitamins, minerals, and compounds vegetables provide include fiber, magnesium, chromium, potassium, calcium, folate, vitamin C, vitamin A, and phytochemicals like antioxidants.  I was going to embark upon an in-depth foray into each of these, but it just got too damn boring.  I will spare you some brain cells.  If you really want to check them out, good sources for more information are: the Linus Pauling Institute from Oregon State University and the World's Healthiest Foods.  

Despite the numerous benefits of plant foods (and you are just going to have to take my word for it, sorry Levar Burton), I am having a hard time finding vegetables as the primary source for most vitamins and minerals.  Animal meat (including eggs and fish and especially liver) is right up there with most plant sources.  Okay, fiber and phytochemicals are only obtained through plants, but all of the others can be found in meat.  Why is this?  Well, animals eat plants, so the vitamins and minerals wind up in their tissues, just like they are in ours.  Since animal tissues closely match the array of nutrients we also need in ours, they are a great source for nutrients.  However, the forms of these nutrients are often different from those in plants.  Sometimes that is beneficial, as they don't require processing inside our bodies, and sometimes that source is too diluted or not as bioavailable as it is in plants.  We'll continue our discussion of vegetables (and meat) in "Why No Grain" coming up in our Starter Series.

Since fiber and phytochemicals are best found in vegetables, let's just discuss them briefly:

Fiber
Fiber is a biggie.  Plant cell walls cannot be broken down by our bodies--we CANNOT digest cellulose.  Realizing this fact was life-changing for me.  Like many, I went through a "cool" teenage vegetarian stage and based my whole worldview around eating plants (yeah, and some dairy--hard to give up cheese!).  It was mostly just to piss off my parents and not eat what The Man told me to eat.  I survived, just as I somehow survived my days of subsisting off of breakfast cereal for three meals a day in college.  Neither was ideal.  But realizing that humans differ from cows, that we cannot digest most of what a plant IS, came as a shock.  Paradigm shifted.

But that indigestible material still is important.  Cellulose along with other cell wall components works its way through our digestive tract and out the other end.  Healthy regularity ensues, much to our chagrin!  Fiber also feeds our very own tenants, residents of our digestive tract: bacteria.  For example, oligiofructose is an interesting plant sugar molecule that behaves as fiber--we can't break it down until it gets to the colon (large intestine).  This is where it undergoes fermentation through bacteria. Since it keeps our healthy bacteria well-fed and prospering, it helps them outcompete the harmful bacteria also living in our gut.  One for the good guys!  Oligiofructose's slow digestion doesn't spike blood sugar like most sugars, even though it adds sweetness about 30-50% the potency of table sugar.  Oligiofructose is best found in chicory root, raw dandelion greens, garlic, Jerusalem artichokes, jicima, leeks, asparagus, and onions.  It is called a prebiotic for its benefit to digestive tract flora and has a synergistic effect when coupled with probiotics (beneficial bacteria introduced through the diet, like those clumpy, mucusy strands in kombucha) because it helps the additional bacteria thrive.  Yay!  Isn't it fun to think of your body as microscopic battle ground and home to a host of little beasts!  Really makes you wonder who's really in charge...

Phytochemcials
In addition to the vitamins, minerals, and fiber they provide, plants also provide phytochemicals like flavonoids and carotenoids, some of which are useful as antioxidants in our bodies to keep harmful, cancer-causing free radicals at bay.  Antioxidants also play a particularly important role in protecting against the oxidation of LDL cholesterol, which has been linked to heart disease much more reliably than overall cholesterol, HDL/LDL ratio, or total LDL count.  More specifically, garlic has been found to reduce LDL oxidation.

There seems to be a correlation between eating more fruits and veggies and reduced risk of cancer, cardiovascular disease, stroke, and high blood pressure.  For example, cruciferous vegetables (brussels sprouts, broccoli, cauliflower, kale, cabbage, etc.) contain sulfur compounds that may protect against lung and digestive tract cancers.

Bottom-line: veggies are good for you.  Duh!

Eat Your Veggies

A BIG problem for most parents is getting the kids to eat veggies.  Sometimes they won't even try what you make.  I am not a big fan of the "hidden veggies" strategy some parents use to trick their kids into eating their veggies.  That defeats the purpose.  While you may be nourishing them, the kids aren't adopting healthy eating habits and aren't learning anything about nutrition.  In fact, you are merely strengthening their view that veggies aren't meant to be enjoyed, that they have to be drowned in other flavors to be palatable.  Vegetables need more appreciation and should contribute to (not detract from) a tasty, healthy meal.

Here are some ways to integrate more veggies in your family's diet:

1.  Unleash your kids in the produce department.  Allow them to find and bring back interesting veggies to take home and try.  Together, you can research recipes with them and agree on something that looks tasty.  This is a great way to get your kids involved in their health.

2.  Plan meals together, as a family, and agree upon vegetable preparations that will please everyone.  This method gets your kids involved in meal preparation and let's them take responsibility for eating what they agreed to make.  If they can't agree (surprise, surprise!), take turns choosing the veggie the family will eat and always have a backup veggie like carrots, celery, and salad that should be permanent residents of your refrigerator.  Ever try snacking on romaine hearts?  If not, you're missing out.  Seriously!

3.  Cook together.  I know this is a luxury for many families, but with whatever time you have however often you can manage, get your kids to cook with you.  Seeing what it takes to bring food to the plate is a great learning experience and builds their life skills.  These are lessons they won't learn in most schools.  Teach them how to cook.  It's a gift that will set them down the right path in life.

4.  Hedge your bets.  I never make an entirely new meal filled with all new ingredients we are trying out for the first time.  That sets the stage for disaster.  Instead, pair some old stand-bys with something new--this way, there is always something good to remember about the meal and most of it can be eaten, even if the new item is a flop.  For example, pair new veggie preparations with your family's favorite meats.  Always have a backup veggie for emergencies, like carrots or salad (sorry, potato chips don't count).  Encourage your children to try new veggies, but also allow them to fall back on healthy alternatives.  For example, I am sure we have all been through a "I'm not eating what my parents make" phase.  For me, I had bread and cheese every night.  Of course, now I realize what an idiot I was and that I should have just subbed out the meat and/or veggies with ones I could stomach, that were MY choice--take that Mom and Dad!

5.  Do as I say AND as I do.  You are your child's role model, whether they want to admit it or not.  If you make the effort to eat healthy, so will they.  Lead by example.  You can control the food in your house.  Take charge!

Prac App

I've already written a bunch of veggie recipes on my blog.  Here they are again:
Fig Salad with Lemon-Walnut Dressing
Spoon Salad courtesy of Simply...Gluten Free
Kale Chippies
Eggplant Chippies
Simple Roasted Cauliflower
Kristy's Cauliflower Rice with Cilantro-Lime Curried Rice and Indian Spiced Paella variations
Zucchini Pasta
Spaghetti Squash Pasta
Kale Salad

Today's recipe is Noodle Nosh.  Scared to give up noodles?  Fear no more.  Crave those stringy strands of deliciousness?  I have just the thing and it works perfectly.   Kelp noodles.  I know, I know, kelp?  Doesn't that just conjure up fishy, saltwater memories of getting tangled up in slimy ickness?  Well, today we're creating new memories.  Kelp is, as Alton Brown would say, "good eats."

So without further ado, here is our recipe!


Noodle Nosh
Crunchy, noodley and filled with delicious flavor--this subs for take-out any day!
Cooking Time: 1/2 an hour start to finish
Makes enough for at least 3 heaping bowls

Ingredients:
  • 1T chopped garlic (4-5 cloves)
  • Wheat-free Tamari sauce (you'll need at least a couple teaspoons, but we'll add it incrementally--or if you want to go full paleo, ditch the tamari)
  • sesame oil (you'll need 2T, but each T is measured and added separately)
  • stir-fry suitable grass-fed beef (this is NOT the application for ribeye/new york!--use crappier cuts :) ), cut into bite-sized hunks (use as much as you need to feed your family/self)
  • 1 container/bag of brocolli slaw
  • 1 c fresh shiitake mushrooms (not dried), cut in half
  • 1 bag of kelp noodles (found in the refrigerated section by pseudo-meats), rinsed and drained
  • optional: chopped ginger, other veggies
Method:
First, heat a skillet or wok over medium-medium high heat.  Add 1T sesame oil and all of the chopped garlic.  Once popping/sizzling, add the beef and brown each side.  Add some Tamari (like 1t or so) while cooking.  Once each side has some color but before it's cooked through (I hate overcooked beef), remove the beef from the pan into a bowl (keeping the juice inside the pan).  Now, add 1T of sesame oil and the mushrooms and give them a couple of minutes to lose their water and shrink.  Then, add the broccoli slaw and add more Tamari.  Cook for a few minutes to soften the slaw.  Then, add the kelp noodles, breaking up the clumping strands.  Stir into the slaw to incorporate.  Cook for a minute to warm the noodles and distribute them.  Then, add the beef back in, stir and adjust flavoring as needed (add more Tamari or sesame oil and desired).  Turn off the heat, remove the dish to a bowl, serve portions, and enjoy feasting upon some delicious, healthy noodles that trump Chinese take-out hands down!


Okay, so how does our recipe of the day exemplify Eat Vegetables?  For its veggies, we have kelp noodles, broccoli slaw (broccoli and carrots), shitake mushrooms, and garlic.  Kelp noodles are nutritional powerhouses, serving as a great source of iodine.  Sea vegetables are a sustainable resource.  In fact:
Seaweed doesn't require arable land, fresh water or fertilizer. Kelp grows swiftly -- 2 feet a day in some species -- and produces no runoff or erosion. It cleanses the water of excess nutrients and absorbs carbon dioxide, a greenhouse gas that contributes to global warming.
Broccoli is a cruciferous vegetable, which we mentioned earlier.  It is also high in vitamins and protective against an array of ailments.  Carrots are beta-carotene powerhouses, the richest vegetable source.  Being good for healthy eyesight is just one of their benefits.  Garlic also had an earlier mention as protective against LDL oxidation.  It is also a great source of B6 and vitamin C and selenium.  Garlic has cardiovascular health benefits and boosts immunity.  Shiitake mushrooms also have powerful antioxidants and promote a healthy heart and immune system.  Although their nutrient content is low, they are still sources of vitamin C and iron.  

Couple of caveats: the sesame oil is high in omega-6 fatty acids, so use it modestly and try to choose higher omega-3 fatty acids to balance it out: grass-fed beef and fish oil supplementation.  Wheat-free Tamari sauce is a paleo-cheat that I rarely indulge in.  While it doesn't contain wheat (yay!), it does contain soy (boo!) and lots of sodium (boo!); however, the fermentation process (like an 18 months-brine bath) strips the soy of most lectins and anti-nutrients, so it is considered safe for us to eat, in moderation.  I guess this is like sugars--ideally, ditch them, but we know that most people need to indulge every once and a while, so here is an acceptable cheat with minimized repercussions.

The processing required in this meal is more than I would like, but we need to be realistic.  The broccoli slaw could be home-made with a noodle peeler (see my zucchini noodle recipe), but this time I erred on convenience and bought the packaged slaw from the store.  Making everything from scratch and only buying local products is rough.  I respect those able to dedicate themselves to their food to that extent.  Unfortunately, at 7:30 on a weeknight, I am NOT one of those people.

So hopefully I have added a new meal to your culinary repertoire capable of meeting the everyone's basic requirements: a)  healthy and b) fast!   Let me know how you like it!


Kelp on Foodista