Showing posts with label cabbage. Show all posts

Wednesday, September 7, 2011

DIY Food Adventure: Slow Cooker Carnitas with Confetti Slaw

My CrossFit gym is embarking on a new kind of challenge, simply cooking and preparing your own food called the DIY Food Adventure.

So starting today, I am going to try to cook/prepare all my food--which is certainly going to be a tough one when I am moving this coming weekend.  But trying is an important step--despite that annoying Yoda quote my husband always throws at me: "Do or do not; there is no try."  To me there is a try with the intention of doing--it just doesn't always make it.  And with food, the LAST thing you want to do is beat yourself up over every transgression from your ideal.  Live your life and try your best.  My parents used to never get mad at me if I screwed up a test or grade in school as long as I "tried my best."  And we all know when we have really "tried our best" and when we haven't.  

The Prep

Sunday was the mega grocery shopping trip, spending about $150 at New Leaf, our local, better version of Whole Foods.  That bought us a slew of produce (I missed the farmer's market this weekend) and a 7.43# slab of pork shoulder roast for carnitas.  We also have store-bought eggs that are best for hard-boiling (I've tried the fresh ones and they just aren't as easy to peel or hold together as the shelved varieties with a little more age on them).  Finally, we bought whole chickens to roast for lunches and dinner that night.

Hard-boiling method a la America's Test Kitchen:

  • Place 6 store-bought eggs (omega-enriched and as close to farm as you can get them from the store--but trust me, store-bought is better than fresh for hard boiling) in a sauce pot filled with water to cover the eggs and sprinkled prodigiously with kosher salt. 
  • Allow the water to come to a boil over high heat.
  • When it is rapidly bubbling--meaning large bubbles breaking the surface, rolling-style--turn off the heat and remove the pot from the burner, cover, and let stand for 10 minutes (a little longer if you cook more eggs or a little less if you really lagged on catching that boil--we've all been there and heard the water splattering rather than the boiling bubbles).  
  • While the eggs are finishing, get out a big bowl and fill it with ice and water and once your ten minutes are up, add the eggs using tongs (not your hands, silly) and let them cool off in their ice bath like you'd love to do post-WOD.  
Perfect eggs and NO sulfur smell.  Done in less than 30 minutes start to finish.  Store in the fridge.


Here is the Roasted Chicken recipe we used, from Thomas Keller, posted on epicurious: My Favorite Simple Roasted Chicken Recipe.  Although the photo above was taken after an overnight in the fridge, it hopefully still captures a little bit of that brown, crispy goodness from when it was pulled from the oven.  I can't believe how juicy and flavorful the meat is and how that salt really makes it delicious.  It is like a brined bird, but SO much easier.  Better than rotisserie.  And just about as simple as buying pre-made.  Seriously. 

We had some roasted chicken for dinner that night--couldn't resist it fresh and crispy--alongside steamed artichoke hearts dipped them in melted grass-fed butter.  Yum!


I also made a roasted red pepper and baby bok choy stir fry to have more veggies in the house--perhaps for dinner variety or lunches/snacks.  Here is the recipe I used (substituting grapeseed oil for olive oil and yellow bell peppers for red ones): Baby Bok Choy with Yellow Bell Peppers Recipe.


Slow Cooker Carnitas
Don't have time to spend 3-4hrs watching a pot of carnitas?  Here's the answer: slow cook it!  Sweet and as spicy as you want it, this versatile, delicious pulled pork is definitely a staple in this household.

Cooking Time: 6+ hours on Low in the slow cooker, 45 minutes or so on the stovetop to brown
Quantity: Never as much as you would love to have to last forever.

Ingredients:
  • pork shoulder/butt--as big as you can handle and as untrimmed of fat as you can get.  I like to get as many meals as possible so 5# is a minimum.
  • orange juice or any juice--we've tried a bunch with success (the small ~15oz bottles do well)
  • salt
  • pepper
  • garlic (cloves or powder)
  • spices to taste (ex. cumin, cayenne, you name it!)
Method:
First, pour the orange juice into the slow cooker pot and add your salt, pepper, garlic, and spices.  Swirl to dissolve and distribute.  

Then, cut the pork shoulder into fist-sized hunks. DO NOT trim it of its fat--you need it for frying.  Add the hunks to the pot and then toss them in the OJ mixture to coat each one.  Next, mash them down into the juice and set your pot a-cooking: Low for 6 hours or so--we've done less for smaller batches and more for larger ones.  You just want to make sure it is fall-apart tender, but you are going to still cook it more, so it doesn't have to be a 12-hour affair.  

Once it's done with the slow cookin', it's on to stage 2: the fryin'.  Dump the contents of the slow cooker pot into a huge stove-top pot (like a stock pot--NOT non-stick) and heat on the higher side of medium high--like 8 out of 10.  It'll boil away for about 30 minutes or so depending on the quantity of meat and liquid until it starts to stick and that is when the fun begins.  Start your scrapping as soon as it starts a-stickin'.  A strong spatula (read: metal, NOT plastic) works wonders.  Come back often to re-scrape until the liquid is basically completely gone and you feel like it is just going to burn or dry out if you leave it in there much longer.  

Then, if you have a ton of fat in the pot still (this used to happen to us, but hasn't in a long time--probably because the butcher still partially trims off some fat despite my efforts), you can drain the meat before storing and keep that fat for a butter substitute.  If you don't have much liquid, just dump the meat and juices into a storage container.  It'll last for a week in the fridge, but ours never stays around that long :)  

Serve with Confetti Slaw (below), salsas, guacamole or just avocado, on lettuce leaves as tacos, in eggs, or however you want to enjoy that unbelievably delicious porky goodness.


Confetti Slaw
A beautiful symphony of flavors, texture, and crunch!  Basically a play on the Crunchy Slaw I made for my Hearty Paleo-Zone Chili, this slaw is more finely diced for ease of incorporating with the meat and being picked up by utensils.  It is a great way to add some veg without it overpowering the dish.

Prep Time: 15 minutes or less
Quantity: a truckload

Ingredients:
  • head of green cabbage
  • head of red cabbage
  • bunch of cilantro
  • 3 or so limes

Method:
Remove damaged outer leaves from the cabbages and any wilted, brown/black cilantro leaves.  Cut the cabbages into hunks and salad spin them to rinse.  Add them back into the salad spinner bowl once you rinse it out (the outer one, not the colander) for storage and assembly of the slaw (yes, it makes that much!).  

In small batches, food process the cabbage into a dice.  This takes patience not to over-stuff the food processor and have to fish out large chunks when you upend it into the bowl.  Not fun.  If you move fast, the multiple batches won't be too annoying.  It beats trying to hand-chop every piece down to a dice.  Believe me, I've tried and made a mess.  

Once the cabbage is done, rinse the cilantro, remove any woodier stem sections, and food process that too.  Add it to the bowl.  

Finally, roll the limes on the counter to release some juices, then cut and juice (it pays to have a citrus juicer).  Add the juice to the bowl and stir it up.  Taste and add more limes if you have them (or lemon juice can substitute).  I would wait to salt it until serving your portion because I have ruined a whole batch with over salting before--I think the citrus can accentuate it.  Add any other flavors you desire.  The Confetti Slaw should add a gorgeous splash of color and a nice lime scented crunch to your dish.  Load it up on the carnitas for a great meal!

Let me know how you like to serve your carnitas and if you've tried my recipe!

Thursday, January 20, 2011

A Dinner in the Zone: Hearty Paleo-Zone Chili on Roasted Portobello Mushroom Caps with Crunchy Slaw


Those of you Zoning with me may be a little sick of the piecemeal, thrown together meals we often fall back on.  The ease of just finding a Protein source from the list, Carb source from the list, and Fat source from the list and combining odd choices just to get the balanced blocks can take it's toll on your meal-time satisfaction.

But I am here to offer another option: cooking a Zone meal that will make many dinners to come as easy as portioning and reheating.  And did I mention that it's filling AND delicious?  Sometimes with the calorie reduction inherent in the Zone Diet and the emphasis on fruit and starchier carbs for easier blockage, people feel hungry all the time and starved.  This meal utilizes lower glycemic ingredients (vegetables) to satisfy you at the end of a long day of weighing and measuring. And it's filling whether you're eating only a two-block portion or a five-blocker.  Yes, eating well CAN actually happen on the Zone!

THE MEAL

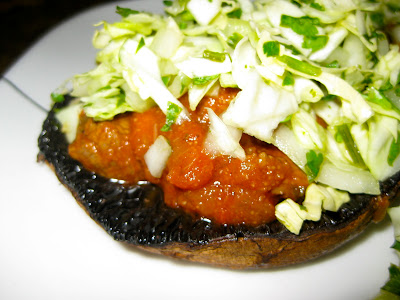
I began my Paleo-Zone challenge last Saturday and will post my food log soon, but for now, let me share with you this amazing meal I've had for dinner this week.  And with the amount my husband and I made, we'll probably still be having this meal well into next week :)  This meal is Hearty Paleo-Zone Chili on Roasted Portobello Mushroom Caps with Crunchy Slaw spooned on top (all recipes follow).  It's delicious and hearty--which is no simple task when cooking and eating on the Zone.  At two blocks or five, this meal will fill you!

The chili is a rich and spicy mix of vegetables and grass-fed beef.  It is FILLING, which is the perfect quench for end-of-day hunger, and it's warming to combat chilly evenings.  I was inspired by paleo chilis that hold the beans, Alton Brown's amazing Pressure Cooker Chili (sans the pressure cooker for us) that turned us on to using chopped beef instead of ground beef, and the Chan's Chili recently posted in the CrossFit Journal, which helped us Zone proportion our chili. Whether you Zone or not, this chili is amazing and you definitely won't miss the beans. 

Instead of straying off the Paleo Diet for rice or tortillas, I serve the chili on Roasted Portobello Mushroom Caps that add a meaty base.  SO much more filling than rice or tortilla, these mushrooms are a great base for any meaty sauce.  The chunky, silky texture of the chili is complemented perfectly by crunchy, lime and onion slaw I call Crunchy Slaw.  It is SO easy to make and adds that taste and crunch that definitely kicks the chili up another notch. 

For the recipes below, I used P, F, C to stand for Protein, Fat, and Carb, which the Zone Diet uses to balance food.  A block of Protein = 7g protein, a block of Fat = 1.5-3g depending on the fattiness of the Protein, and a block of Carb = 9g after fiber is subtracted.  For Zone Block charts, check out this compiled list: http://www.mitymous.net/weights/zoneblox.htm

NOTE: there is definitely some flexibility to these measurements as some of the foods I used below have different measurements based on different Zone block lists.  Since this meal is mostly veggies, I am not going to fuss about which count is correct and whether I have measured it precisely.  The Zone is enough effort just to weigh and measure everything.  In this case, allow yourself some leeway on the veggie counting and err on the side of MORE.  :)

Without further ado, here are the recipes!

Hearty Paleo-Zone Chili--this is only one of three containers we filled to the brim!

Hearty Paleo-Zone Chili
Definitely not for a quick meal, this endeavor will provide you with chili to feed an army or yourselves for a week (maybe two?) on the Zone.  The medley of grass-fed beef, assorted vegetables, and spices will heartily fill and warm your belly. 
Prep Time: 1hr give or take your mad knife skills and helpers
Cook Time: 2-3+hrs, slow cooker for the day/night or stovetop for a few hours until tender and delicious.
Quantity: see Our Totals below.  You can use the ingredients in your own proportions to make the quantity you desire.  We're going for a 2P:1C:1F ratio so you can serve this on Roasted Portobello Mushroom Caps with Crunchy Slaw on top.

Ingredients:
NOTE: I'll give what makes a block and how much we used, but you have to be your own guide for making this Zoned to meet your desired quantity and taste.
  • yellow onions, chopped (1.5c = 1C, 10 onions gave us 10c = ~6C)
  • mushrooms, chopped (3c = 1C, one container of sliced mushrooms = 3C and we used 4 = 4C)
  • can of crushed tomatoes (with Basil) (check your label, ours was 1/2c = 1C and we used (2) 28oz. cans or 10C)
  • zucchini, chopped (2c = 2C, we used 6 small ones and got 8 cups or 4C)
  • grass-fed chuck roast, chopped (1oz = 1P and we used 56oz = 56P)
  • container of salsa (check your label, ours was 1/2c = 1C and we used 2c = 4C)
  • cumin
  • chili powder
  • salt
  • pepper
  • garlic powder
  • olive oil (1T = 9B and we used 3T = 27F)
  • optional: chili peppers or other heat multipliers (NOTE: the chili powder and cumin made this pretty spicy on their own, so play around with it to your taste)
  • a writing instrument and sheet of paper to record your amounts and calculations

Our Totals: 56P, 28C, and 28F is a 2:1:1 ratio, so we need to add a Carb and Fat to every portion of chili.  That is perfect for a serving with Roasted Portobello Mushroom Caps (1/2C, 1F) and Crunchy Slaw (1/2C) (see recipes that follow).  Our finished batch was 187oz. and dividing by the 56P that went into the pot gives us 3.33oz for 1P, 1/2C, 1/2F.  Your batch will vary on your ingredients and finished thickness and weight, so do your own math on this one.  Sorry, Zone cooking isn't a piece of cake, but it is well worth the effort to not stress about dinner for a week (or more)! :)

Method:
Chop till you are blue in the face.  You should start on the onions and add them to a large stock pot set over medium high heat and coated with olive oil (1T worked) and a little salt.  I like to season as I add new ingredients into the pot, a lesson learned from years of watching Emeril as he bammed the crap out of his dishes.  Stir the onions every time you add more to the pot and add more oil if they start to stick.  Record how many cups of onions you use and keep a running tally of the oil.  Remember to try to be frugal with the oil if you want to stick to plain Jane Zone. Those of you lean enough to be using Fat multipliers can have more flexibility--damn you ;).

Meanwhile, a second pair of hands can chop the chuck roast into tiny bits, cutting out any really awful sinewy parts if desired.  Once that's cut, weigh it to use your desired amount and write that number down so you can figure out total blocks later on.  Using another skillet, coat with olive oil (1T worked) and brown the beef (use multiple batches so you only have one layer of meat in the pan, add more oil for each batch--it took us two batches using a big skillet).

Next, to the onions in the stockpot, add the sliced mushrooms (I bought them already sliced, so no prep there!--measure them out if you want to be precise, but for each styrofoam-like container it was about 3c).  Stir and cook them down.  We're looking for translucent if not browning onions and reduced size in the mushrooms as they cook.

The first pair of hands can move on to chopping the zucchini or you can get to it after the meat is done.  Measure out how much you use by the cupful.

Once the meat is done, add it to the stock pot (batch by batch is fine), then add the zucchini, tomatoes, salsa, and spices.  For the spices, be your own judge based on how much you are making at once.  Remember, it's always easier to add more heat later than find Zoneable ways to reduce it after the fact. Unfortunately sour cream and guacamole are Fats that will easily devour your blocks unless you allot them.  Let your chili reduce over Medium heat until you like the thickness, then Low for as long as you like to meld the flavors and tenderize the beef and veggies.

Once done, you have one more fun task: measuring the result of your labor of love.  We tried to be sneaky and weigh the empty pot, then the full pot, but the pot was too heavy for the scale :(  So we weighed storage containers and then filled them, took their weight and got the whole picture the hard way.  You could also measure by Pyrex liquid measure as you remove the chili from the pot and place in storage containers.  Either way, from that number of total weight, divide it into total blocks of Protein and figure out ounces or cups per block of Protein.  From our ingredients, we came up with a 2:1:1 ratio and found that 3.3oz. gives us 1P, 1/2C, 1/2F.  Yours will vary based on the quantities and thickening of your chili.

We served ours over Simple Roasted Cauliflower (3c =1C, plus a little fat) or Roasted Portobello Mushroom Caps (1/2C) (recipe follows) with Crunchy Slaw (1/2C) (last recipe) on top.  


Roasted Portobello Mushroom Caps
For a meaty base perfect to hold chili, burgers, ragout, or anything else you desire, try better-than-bread roasted portobello mushrooms!
Cooking Time: 15min+, really as long as you like to get them tender and juicy
Quantity: 2-3 roasted caps, depending upon size, is about 1/2C if 3 cups = 1C

Ingredients:
or parchment paper and baking sheet
  • portobello mushroom caps (rinsed and stems removed) (3c = 1C, so 2-3 caps after roasting seemed like 1/2C)--NOTE: make extra so that you have meals for a few nights.  The mushrooms will keep well sealed up in the refrigerator.
  • olive oil (1/3t = 1F), optional
  • salt 
  • pepper


Method:
Preheat your oven to 425 degrees. Line a baking sheet with Silpat or parchment paper so you don't have to use fat to grease the pan.  Place mushrooms on the sheet, gills up.  Sprinkle caps with salt and pepper and drizzle on the olive oil you need to accumulate your desired fat blocks.  If you don't have any fat to spare, the caps are fine without any oil.  The liner is our insurance :) Place the sheet in the oven and bake until juicy and tender.  These are perfect to make in bulk while you are preparing and cooking the chili!  Afterwords, you'll have a delicious base to your chili that is spoon tender, meaty, and filling!


Crunchy Slaw
The perfect crunchy slaw for your spicy dish!
Prep Time: 5-10min tops
Quantity: Made enough for at least 4-6 plates, so about 1/2C for each serving. 

Ingredients:
  • 1/2 head of cabbage (4c = 1C)
  • 1/2 onion (1.5c = 1C)
  • 1/2 bunch of cilantro (unless you are using a bucketful, it's unlikely you'll come close to a block)
  • 1 lime, juiced (1C)
Total Blocks = 3C

Method:
Chop the cabbage, onion, and cilantro as finely as desired and mix well.  Add lime juice and mix again.  There you have it!  This is a perfect, crunchy, tasty accompaniment to tacos/chili/anything Mexican inspired!

So there is your meal: Hearty Paleo-Zone Chili served on Roasted Portobello Mushroom Caps with Crunchy Slaw on top!  Here's to enjoying what you eat on the Paleo-Zone Diet!